

Installing flashing on metal roofs is a crucial step in ensuring long-lasting protection from the elements. Flashing acts as a barrier against water infiltration, directing rain and moisture away from vulnerable areas like valleys, chimneys, and dormers. Proper installation is key to avoiding costly repairs and maintaining the integrity of your roof. Whether you’re a DIY enthusiast or a seasoned roofer, understanding the correct techniques and using the right materials can make a significant difference in the performance of your roof. In the following guide, you’ll learn about the tools and materials required, step-by-step installation processes, best practices to follow, and common mistakes to avoid to ensure your metal roof is properly sealed and protected for years to come.
Table of Contents
Tools and Materials You’ll Need
To install flashing on a metal roof effectively, you’ll need to gather a few essential tools and materials. Having the right items on hand will ensure the installation is seamless, secure, and durable. Here’s what you’ll need: To install flashing on a metal roof effectively, you’ll need to gather a few essential tools and materials. Having the right items on hand will ensure the installation is seamless, secure, and durable. Here’s what you’ll need:
| Category | Item | Purpose |
| Tools | Measuring tape | To measure the areas where flashing will be installed |
| Metal snips | To cut flashing materials like aluminum, copper, or galvanized steel | |
| Hammer or drill | To drive roofing nails or screws to secure the flashing | |
| Roofing nails or screws | To fasten the flashing components to the roof deck. | |
| Caulking gun | For applying sealant or roofing caulk to ensure a watertight seal | |
| Utility knife | To trim roofing felt or underlayment for proper installation | |
| Chalk line | For marking straight lines to guide the flashing installation. | |
| Safety gloves and goggles | For personal protection from sharp edges and debris | |
| Materials | Metal flashing | The primary material for flashing, choose from aluminum, copper, or galvanized steel based on your needs. |
| Sealant or roofing caulk | To create a watertight seal along seams and edges. | |
| Roofing cement | Used to secure and seal flashing in place | |
| Roofing felt or underlayment | Added under flashing for additional waterproofing | |
| Primer (if using aluminum flashing) | Improves adhesion of sealant and caulk |
Preparation and Workspace Setup
1. Assessing the Roof and Choosing Materials
Begin by thoroughly assessing the roof’s layout to identify critical areas like valleys, chimneys, and dormers where flashing is most required. This assessment ensures that the proper amount of materials is selected. Opt for suitable materials such as galvanized steel, aluminum, or copper, which provide exceptional durability, aesthetic value, and affordability. Using long-lasting options enhances the value and success of your project.
2. Clearing and Organizing the Workspace
For a smoother installation process, start by clearing the workspace of all debris. A clean, clear surface is crucial for effective work. Equip yourself with the right tools, including sturdy ladders, sharp snips, and protective gear like goggles and gloves. Maintaining safety during the task is essential, so ensure a stable working environment. Gather any extra materials or tools you may need to avoid interruptions.
3. Preparing for Installation
Proper preparation is key to achieving a flawless result. Lay out all materials, checking for wear or damage, and make precise adjustments using your tools. Focus on cutting the flashing to fit the designated areas, minimizing obstacles. The process becomes significantly more efficient with well-organized tools and a clear plan. By following these steps, you set yourself up for a successful and long-lasting project that delivers high value.
Cutting and Preparing Flashing
1. Measuring and Marking
Start by selecting your metal and using a measuring tape to measure the length and width of the areas where the flashing will be installed. Carefully transfer the measurements onto the flashing material to ensure the correct size and shape. Be sure to leave enough material for a slight overlap, as this is essential to fully cover the entire area and provide adequate protection. Accurate marking and preparation are critical for a proper fit.
2. Cutting and Shaping
Using sharp snips, cut the flashing according to the marked dimensions, ensuring precise and clean edges. It is important to work accurately, as poorly cut or ill-fitting flashing may fail to protect the roof and lead to water damage. Make sure Each piece matches the requirements of the designated parts of a metal roof, ensuring proper functionality. Attention to detail and a focus on precision will guarantee that the flashing is ready for installing and will perform effectively.
Installation Process
Install Sidewall Trim
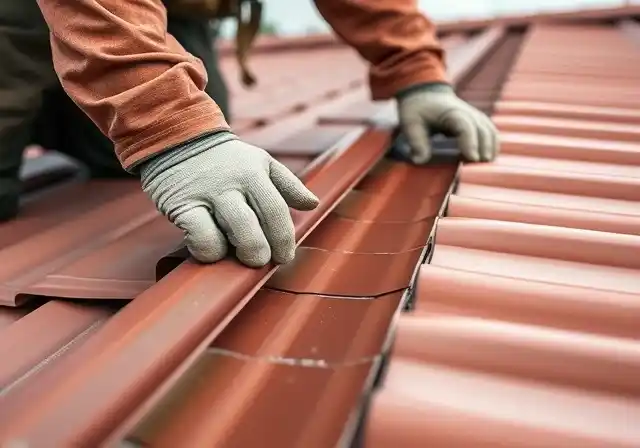
To start, measure the sidewall trim carefully to fit the roof. Use metal cutting snips to cut along the traced line on the trim, ensuring it fits snugly. The sidewall trim should be positioned to overlap the base flashing, forming a watertight seal that prevents water from penetrating. Secure the trim with nails or screws, ensuring they are spaced 12” on center to hold the trim firmly in place. The trim should extend slightly beyond the roof deck, directing any rainwater towards the gutters to prevent moisture buildup around the edges.
Install Drip Edge Flashing
Next, focus on the drip edge flashing. This is an essential part of the roofing system, designed to direct water away from the fascia and into the gutters. Position the flashing along the edges of the roof, ensuring it overlaps with the underlayment for a secure fit. Nail or screw the flashing in place at regular intervals, ensuring a consistent hold along the entire edge. You may need to use metal cutting snips to trim the flashing to the proper size, making sure it fits seamlessly. The flashing should extend slightly beyond the roof edge to help water flow smoothly into the gutters, ensuring a watertight seal.
Install Step Flashing
For step flashing, start at the lowest point of the roof, especially around areas like chimneys and dormers, and work your way up. Each piece of step flashing must be bent at a 90-degree angle to fit snugly against both the roof deck and the vertical surface. As you place each piece, ensure it overlaps the one below it to create a continuous barrier that directs water away. Nail each piece of flashing to the roof deck (but not to the vertical surface), and alternate between placing shingles and flashing. This method creates a seamless flow for water, preventing any moisture from seeping into the roof structure.
Install Counter Flashing
Counter flashing is an essential component that adds an extra layer of protection to your flashing system. It’s typically installed over the step flashing and is designed to provide an additional barrier against water infiltration. Begin by measuring and cutting the counter flashing to the desired length. Ensure that it is bent at a 90-degree angle so that it fits snugly against both the vertical surfaces (such as chimneys or dormers) and the roof. Once in place, apply roofing cement or caulk along the edges of the step flashing, then press the counter flashing into the cement or caulk to form a watertight seal. Finally, secure the counter flashing with roofing nails or screws, making sure they are spaced evenly for a firm hold. This step is vital in ensuring no water can seep under the flashing system, particularly at vulnerable points like vertical surfaces.
Install Valley Flashing
When installing valley flashing, it’s essential to ensure water flows off the roof effectively where two slopes meet. Start by laying the flashing along the valleys, ensuring it overlaps the underlayment for a secure and watertight bond. The flashing should be cut to fit snugly in the valley, considering whether you can overlap metal roofing lengthwise to improve water flow into the gutters. Fasten the flashing with the correct number of screws for metal roofing, ensuring the spacing is appropriate for a tight hold. The valley flashing will help direct the water off the roof and into the drainage system, preventing any potential water damage.
Install Endwall Flashing
Finally, endwall flashing needs to be installed along the endwall, where the sidewall trim meets the vertical wall. It’s important that this flashing overlaps the trim and extends slightly up the wall to provide complete protection against water infiltration. Use metal cutting snips to cut and shape the flashing as needed. Secure the flashing with nails or screws, spaced consistently to ensure that the flashing stays in place. The endwall flashing forms an essential barrier against water that could otherwise seep behind the roof edge and into the structure.
Finalizing and Sealing
Once you’ve gone through the process of preparing and installing the flashing, it’s time to finalize the installation with key steps that ensure your roof remains sealed and protected. Sealing all flashing, and adding foam closures are crucial to ensuring the long-term durability of your roof and preventing any potential leaks.
Seal All Flashing
Once your flashing is properly installed, the next step is to seal all of it to create a watertight seal. This prevents any water from sneaking under the edges and causing damage to your roof structure. Apply silicone sealant or a similar high-quality roofing sealant along the edges of all flashing components, including counter flashing, step flashing, and endwall trim. Use a caulking gun to apply a continuous bead of sealant along the seams, ensuring that it is pressed firmly into place. Smooth out the sealant with a utility knife or gloved finger to give it a clean, finished look. Take care to apply sealant in a uniform manner, especially around the corners, edges, and places where the flashing overlaps with metal roof. Pressing the sealant into the seams ensures a tight, leak-free fit, ultimately keeping water out.
Add Foam Closures
Finally, to ensure a weatherproof and secure roof, it’s essential to install foam closure strips. These strips fill any gaps between the metal roofing panels and the roof deck, helping to block out wind-driven rain, debris, and insects. Cut the foam closures to the desired length and place them at the top of the roof and along the edges where the roofing meets the vertical surfaces. The foam closures provide an extra layer of protection by filling in any voids and improving the roof’s overall functionality. Once placed, press them into position to secure their placement.
These final steps ensure that your metal roof remains protected, water-tight, and able to withstand the elements. Proper sealing and securing of all flashing components are crucial for a long-lasting, durable roofing system.
Inspection and Maintenance
Maintaining a metal roof involves consistent inspection and maintenance. Regular checks will ensure that your flashing continues to protect the roof from harsh weather like rain, gusty winds, and blowing snow. To get the most out of your roofing materials and keep everything securely fastened, follow these steps for thorough maintenance.
Inspect the Installation
The first step in maintaining your metal roof is to inspect the flashing installation. Look for any gaps or cracks where water may seep through. Flashing should be securely fastened to ensure that it continues to direct water off the roof effectively. Pay special attention to areas like the chimney’s crown and the dormer’s apex, which are vulnerable to water infiltration. Check if the sealing is intact and whether any loose nails or materials have come loose over time. Inspection helps in identifying problems early, preventing costly repairs down the line.
Clean Up Workspace
After any maintenance work, always clean up the workspace. Remove debris, leftover materials, and waste that might obstruct proper sealing or lead to pooling water. A tidy roof ensures the flashing is performing its job without hindrance. Tools should be organized, and you should inspect the tools used during installation to ensure they’re still in good working condition. By maintaining a clean and safe workspace, you make future repairs more manageable and ensure safety while performing inspections or any necessary repairs.
Preventive Maintenance
Preventive maintenance, along with knowledge to repair a metal roof, is the most effective way to extend the life of your metal roof and flashing. Check for pooling water or signs of clogs in the drainage system, especially around the flashing areas. If you notice gaps or any weakening in the sealing, apply additional sealant to prevent water from penetrating. Preventive measures like recoating the metal roof with weatherproof paint can also help reduce UV damage and keep your roof looking new. Additionally, performing regular roof inspections will ensure that materials remain in good condition, and fastening is still secure. Make it a habit to inspect your roof two times a year—ideally before the rainy or snowy seasons begin.
By staying on top of these tasks, you’ll ensure the flashing remains functional, your roof stays resilient, and your metal roof performs its job effectively for many years.
Best Practices for Installing Roof Flashing
When it comes to installing flashing on your metal roof, following the best practices is essential for a successful installation. Here’s a guide to ensure you do the job correctly the first time:
- Plan Ahead: Before cutting and installing any materials, take the time to measure everything accurately. This will ensure all the pieces fall into place without confusion. Having a clear plan will help you stay on track and prevent wasted time or materials.
- Select Quality Materials: The materials you choose are key to the longevity and effectiveness of your flashing. Use high-quality flashing and sealants that suit the climate of your area. For example, galvanized steel is great for rainy climates, while aluminum is perfect for resisting the sun’s rays and providing protection.
- Proper Alignment: When you lay the flashing, make sure it is aligned properly. Each flashing component should overlap correctly, guiding the water away from your roof. The angles and slope of the flashing should be checked to prevent puddles and leaks, which can cause damage over time.
- Use the Right Fasteners: Secure the flashing components with fasteners that are spaced correctly and fitted securely. This ensures the flashing stays in place without causing any stress points or damage. Be cautious about over-tightening the screws, as this can create unnecessary pressure on the materials.
- Apply Sealant Generously: To create a watertight barrier, apply sealant evenly and generously along the seams. This will prevent water from seeping in, preserving the flashing’s longevity and preventing future repairs.
- Work Safely: Always prioritize your safety during the installation. Wear appropriate safety gear such as a harness, non-slip shoes, and use a secure ladder. If possible, work with a trusted partner to assist in case of an emergency. This will help ensure a safer and more efficient installation process.
Common Mistakes to Avoid
Even experienced roofers can make mistakes during the flashing installation. Here are the common mistakes you should avoid to ensure the performance and protection of your roof:
- Rushing the Process: Take your time with every step of the process. Rushing through the installation can lead to mistakes, like misaligning the flashing or not properly securing it. This could cause water to leak into your home and lead to costly repairs.
- Ignoring Local Building Codes: Never neglect the local building codes and regulations. These are in place to ensure your flashing installation is safe and meets the necessary standards. Ignoring them can lead to fines, penalties, or the need to redo the entire installation.
- Over-tightening Fasteners: While securing the flashing with fasteners, it’s important not to over-tighten them. This can lead to stress points that weaken the roof. Properly spacing and securing the fasteners without applying too much pressure will help maintain the integrity of the flashing.
- Neglecting Ventilation: Ensure that your flashing design includes proper ventilation. Without adequate ventilation, moisture can accumulate underneath the roof, potentially leading to mold or damage to the roofing system. Maintaining proper temperature and moisture levels below the roof will help prevent leaks and ensure a comfortable, leak-free environment in your home.
- Inadequate Sealing: One of the most common mistakes is applying too little sealant or unevenly spreading it across the flashing seams. This can leave gaps and cause water to seep in. Make sure you apply the sealant generously to create a watertight barrier and avoid future leaks.
By following these best practices and avoiding common mistakes, you can ensure that your metal roof flashing lasts for years to come, providing protection for your home from the elements.
Installing flashing on metal roofs is an essential task for ensuring your roof remains waterproof and durable over time. By carefully following the right procedures, using quality materials, and paying attention to details like sealing and fastener placement, you can prevent leaks and water damage. Remember to take your time during installation, prioritize safety, and inspect the roof regularly to maintain its performance. By adhering to best practices and avoiding common mistakes, you’ll achieve a long-lasting, reliable roofing system that will protect your home through all kinds of weather. Proper flashing installation not only improves the lifespan of your roof but also enhances the overall efficiency and comfort of your home.